YouTube Description and Thumbnail Generator
Turn webinar transcripts into publish-ready assets

A few times per month, I host live webinars covering topics like solopreneur operations, automation, and AI.
Prepping for the webinar is the majority of the work. But there’s still a post-webinar process, including editing the webinar recording and posting it on YouTube.
What this automation does
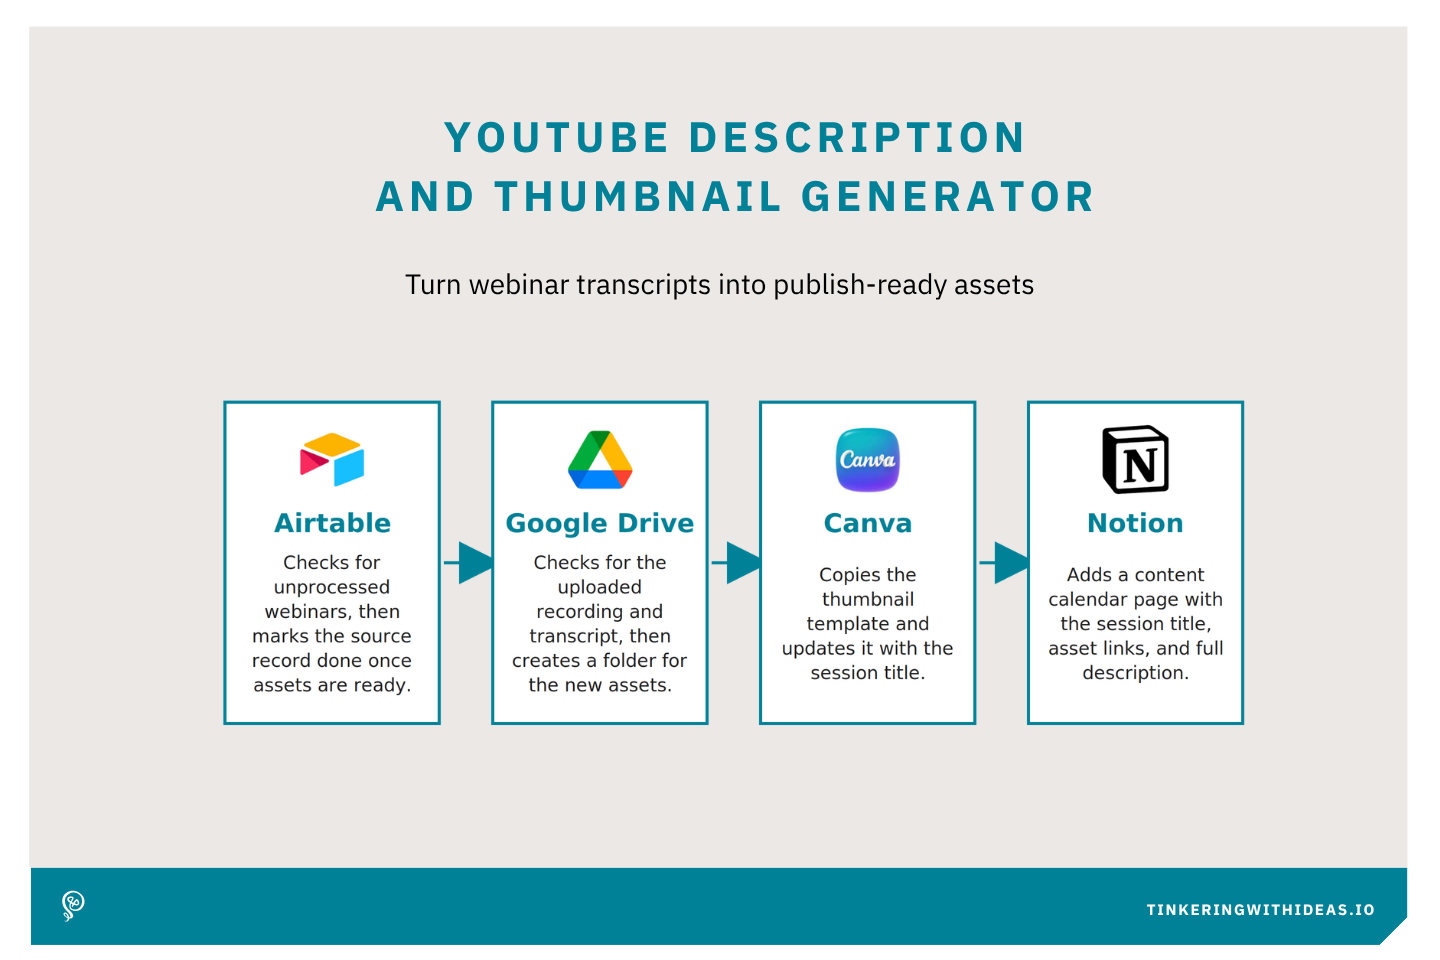
This workflow runs on a weekly schedule and picks up newly recorded webinars based on the uploaded .mp4 on my Google Drive. It reads each session's transcript and writes a YouTube-ready description in my voice. It also generates a thumbnail in Canva and creates a content calendar record. Then it marks the source as “Done” so it doesn’t get processed twice.
Tools
Step 1: Find unprocessed webinar recordings
All of my webinars are planned in Airtable. Airtable stores the link to that webinar’s assets folder. Post-webinar, I upload the .mp4 and the transcript to Google Drive.
A Claude skill checks Airtable for webinars with a date in the past, then checks that webinar’s assets folder in Google Drive. If I’ve uploaded the files, the skill continues.
Step 2: Create a YouTube assets folder
The skill creates a new subfolder for this webinar within my YouTube folder on Google Drive. The folder is named with the date and session title (YYYY-MM-DD - Session Title). This keeps each recording's description and thumbnail organized in one place.
Step 3: Write the YouTube description
The skill loads my voice and tone guide. It parses the transcript and drafts a YouTube description that opens with a short hook and summarizes what the session covers.
The skill looks up the call-to-action used in the webinar and adds the same closing and CTA to the YouTube description. It closes with a standard footer.
Step 4: Generate the thumbnail
The skill makes a copy of my standard thumbnail template in Canva. It moves the copy into a folder designated for YouTube. The copy is updated with the webinar session’s title, so each recording gets a matching thumbnail.
Step 5: Create the content calendar record
The skill adds a new page to your content calendar in Notion, with the session title, a link to the YouTube assets folder on my Google Drive, and a link to the Canva image. The YouTube description is written in the body of the Notion page.
A publish date is added to the Notion page based on a cadence I have set up.
Step 6: Mark the source record as processed
Finally, the skill goes back to the original webinar record in Airtable. There is a checkbox for “processed,” so the skill skips this webinar on its next run.